Showing posts with label Breakfast. Show all posts

The best scrambled eggs

Tuesday, May 2, 2017


I have never been a huge fan of eggs.  Some kinds make me want to vomit (deviled eggs, I am looking at you!), others I can tolerate slightly, but the only kind I actually enjoy eating are scrambled eggs.  I can also do omelettes, which are a form of scrambled eggs.   

Eggs are a great source of protein for our mostly vegetarian family, and they are pretty inexpensive, too, so we have been doing quite a lot of them lately.  

A few weeks ago, I blew myself away by making some truly delicious scrambled eggs.  I was super impressed with how they turned out.  The mix of flavors was majorly delicious.  Subtly sweet, with a punch of salty from the cheese.  I could go on about these all day, but will spare you.  Just go make them! 


White Cheddar, Oregano Eggs:
serves 1

2 large eggs, beaten
1/2 Tbs butter
1/8- 1/4 onion, diced
1/8 cup finely shredded white cheddar cheese
1/4 tsp dried oregano 
sprinkle of garlic powder
salt and pepper to taste

In a small frying pan, melt the butter.  Add the onions and cook for about 10-12 minutes over medium heat, until soft and translucent.  Add the eggs. Add the garlic powder, oregano, salt and pepper.  Cook until the eggs are done (I like mine a little drier, but cook them however you like).  Top with cheddar cheese.  

Enjoy!


Ricotta Pancakes

Wednesday, April 5, 2017


This past weekend was my church's General Conference.  Basically, it is a semiannual meeting with speakers, singing, and inspiring messages.  It is one of the highlights of my spring.  

Typically I try to do something to make it special, so a fun breakfast seemed appropriate.  I had made these ricotta pancakes before, remembered them being really great.  They definitely didn't disappoint. They were a delicious start to a terrific day.  

They would also be a great Easter breakfast, because they are pretty fast, and quite simple to make (although you do have to whip the egg whites).  


Ricotta Pancakes: 
Yields 15-20 pancakes

1 1/2 cups flour
1 tsp baking powder
1 1/2 tsp salt
3 large eggs, separated
1 3/4 cups plus 2 Tbs milk
1/2 cup plus 2 Tbs ricotta cheese
1/4 cup sugar

1 Tbs pure vanilla extract

In a medium bowl, combine the flour, baking powder and salt.  

In a stand mixer, take the egg whites, and whip them until soft peaks form.  

In a large bowl, combine the egg yolks, the milk, the ricotta, the sugar and the vanilla.  

Add the flour mixture and stir until smooth.  Add the egg whites and mix until no streaks are left.  

Heat a griddle until piping hot.  Pour 1/4 cup or so onto the griddle.  Once bubbles form on the top, flip and let cook for another 15- 30 seconds, then remove.  Eat while hot.  

Top with fresh fruit and yogurt or whipped cream, or butter and maple syrup (my personal favorite).  

Freeze any leftovers for up to 2 weeks.  


Peanut Butter White Chocolate Muffins + Growing Orchids

Thursday, March 9, 2017


Currently, there is an orchid sitting on the window sill next to our kitchen table.  No buds on it yet, although this time last year, I counted eight or ten beautiful purple flowers.

Yesterday, I finally noticed that there weren't any buds.  I worried for a moment, although the rest of the plant looks healthy, that maybe it had finally decided to die.   You see, I am kind of a plant nurse.

In a past life, before I had Fox, I worked at a dental office, and we ran through a series of plants that were either killed by inexperienced gardeners, or died from lack of sunlight, and when they were on their way out, I often took them home (I probably brought six or seven plants home over the course of a year).

I love having plants in my home, but they are kind of expensive to buy, so I decided to give these secondhand plants another shot at life, and babied them along.  But one by one, bad things happened to them; one (a gorgeous purple hydrangea) got infested with bugs, a few withered and died, and one or two I gave up on and tossed.

This orchid was the last plant I brought home, and it sat on my window sill for about nine months, almost forgotten.  I would water it when I remembered, usually every week or so, and expected it to fade and die like the others.

Then, one day, I saw a bud appear!  I was completely surprised and thrilled.  I got one flower out of it that time.  The next time it bloomed, I got three.  The next, fourteen.  Each flower was a gift, and I was thrilled every time a new one would appear

We took this plant to Utah last summer, and the long, hot car ride was a little traumatizing for it, I think.  All the petals fell off, and it hasn't bloomed since.

Yesterday, when I caught myself looking at it, I remembered what my gardener mother-in-law said about orchids, "When you want them to bloom, put them in the sunshine."

Now it sits on the windowsill, waiting for the sunshine to help it bloom.  Then my thoughts turned to me.  How often do I fill my life so full of other things that I forget to put myself in the sunshine?  To remember to find the happy in every day, or to appreciate the little things, to find joy in the things I do every day, and to remember that I have been giving so much.

My mom often says that you have to make your own sunshine, and I think I am finally starting to understand.  That doesn't mean the laundry suddenly gets really fun, or that I will ever love doing dishes, but maybe I can take a breather and enjoy the morning on the balcony with Fox.  Be present at the park.  Get down and play trains on the floor, and enjoy the wonder, the smiles and the new words of my little boy.  Take a break from social media and really listen to my husband.

Not every moment is sunshine, but there are sunshine moments to be had every day, so look for them, and you will see them.  I am starting to see them, too.


Peanut Butter White Chocolate Muffins: 
slightly adapted from the Blendtec Cookbook
Serves 12

1 cup milk
2 large eggs
2/3 cup white sugar
1 cup creamy peanut butter
1 tsp salt
1 Tbs baking powder
1 3/4 cup all purpose flour
1 - 1 1/2 cups white chocolate chips

Preheat your oven to 350°F.

In a large glass (or microwave safe bowl), melt the peanut butter slightly, until it is runny.  Add the sugar, then the eggs, then the milk and beat until combined.  Then add the flour, salt, baking powder and flour all at once, and mix until just combined.  Add white chocolate and mix briefly/gently until evenly distributed.

Grease a muffin tin, and scoop the batter into the tins.  Bake for 20-25 minutes, until the tops are beginning to brown, and a toothpick comes out clean. Let cool for 5 minutes, and turn out onto a wire cooling rack.  Best if eaten immediately.


SaveSaveSaveSaveSaveSave

Sugar-Free Date Granola Bars

Wednesday, January 25, 2017


A month or two ago, a friend of ours commented to Adam that she reads my blog regularly, but would like more healthy snack and breakfast posts. 

It thought about this for days, and couldn't think of any healthy snacks at all.  Then, fortuitously, we started our no-sugar challenge, and suddenly, I had to come up with a lot of no-sugar snacks.  

I have been wanting to try dates out for a long time, but was a little afraid of cooking with them.  These granola bars were a terrific snack, portable, and great for old and young alike (Fox loved them!).  

They honestly didn't even need a sweetener, because the dates were so sweet on their own (maybe that was the no-sugar talking... I am not sure).  

Also, feel free to sub in or out different nuts or seeds, I just used all the varieties I had on hand, because I love granola bars to be full of nuts and seeds.  

I would love to hear if there is anything you would like more of here.  I will listen, and do my best to create more of what you like reading/watching/looking at best  Let me know if you have suggestions, whether that be recipe, lifestyle, fashion or video.  

Have a great Wednesday!  


Sugar-Free Date Granola Bars: 

1 cup pitted deglet dates
1/2 cup water
1/3 cup peanut butter, melted in the microwave (feel free to use another nut butter, or seed butter, but they probably won't be quite as flavorful)
1 tsp vanilla
1 1/2 cups oats
1/4 cup almonds, chopped
2 Tbs pumpkin seeds
1 Tbs raw millet
1 Tbs flax seeds
1 Tbs sesame seeds

Preheat your oven to 375°F. Prepare an 8"x8" pan by greasing it well.

In a mini food processor or blender, combine the dates and water, and blend until they somewhat smooth (you will probalby still have a few chunks, but they should be very small chunks).  Put the date paste in a medium bowl and combine it with the melted peanut butter and vanilla.

In a large bowl, combine oats, chopped almonds, pumpkin seeds, millet, flax and sesame seeds and stir to combine.  Add the wet ingredients to the dry ingredients, and stir until they are all combined.

Pour the granola bar batter into the prepared pan, and press it down firmly with a rubber spatula.  Bake for 15 minutes, then remove and cut into bars, but leave them in the pan.  Refrigerate for 30 minutes, then remove the bars from the pan.

You can refrigerate or freeze these bars.  They are a perfect breakfast or snack.  Enjoy!


Beet and Berry Smoothie

Wednesday, January 18, 2017


A few weeks ago, Adam was out of town, and I had all these vegetables that needed to be used up.  Cooking vegetables for a toddler is always a gamble, so I ended up throwing them into a smoothie.

It was delicious, creamy, and bright pink and, unsurprisingly, the toddler fell in love.  So much so that he has been asking for a smoothie every other day since then (although his pronunciation is "smoomie," which makes my mama heart melt).  I keep throwing veggies in it, and he keeps drinking it.  It is a win-win!

A few notes about the ingredients:
-Use really sweet fruits.  The vegetables are not sweet enough to make this a legit sweet smoothie, so sweet fruit is essential.  I often like to throw in a clementine or three into the smoothie instead of an orange, because they tend to be sweeter.
- Zucchini makes the smoothie creamy without adding sugar (I learned this thanks to an insta-friend). You could add a banana instead, or an avocado with good results, I imagine.
- Cut the vegetables into pieces no longer than an inch in length, and blend for a long time.  I typically blend them in my blendtec for 60-80 seconds to ensure a creamy texture and no chunks.
- Adding a raw beet to the mix makes the shake SUPER pink.  I love that, because it makes it much more appetizing to eat.  I have recently recovered from a super dislike of all things smoothie (as of two or so years), so I am still a little wary of green smoothies.  Adding a beet means I can add spinach or other greens, all while enjoying a nice, pink smoothie.


Beet and Berry Smoothie

serves 3-4

2-3 small carrots, tops and bottoms chopped off, cut into 1" pieces
2 oranges (or 3 clementines), peeled and seeded
1 small beet, peeled, tops and bottoms chopped off and quartered
2" long piece of zucchini, tops and bottoms chopped off
1 cup or two large handfuls of fresh spinach leaves
2 cups frozen mixed berries
2-3 cups whole milk (or nut milk, if you like)

Put carrots, oranges, beets, berries, and the zucchini in the bottom of the blender, top with spinach leaves, then pour milk over the whole thing. Blend for 60-80 seconds. Works best in a really powerful blender (I have a Blendtec).


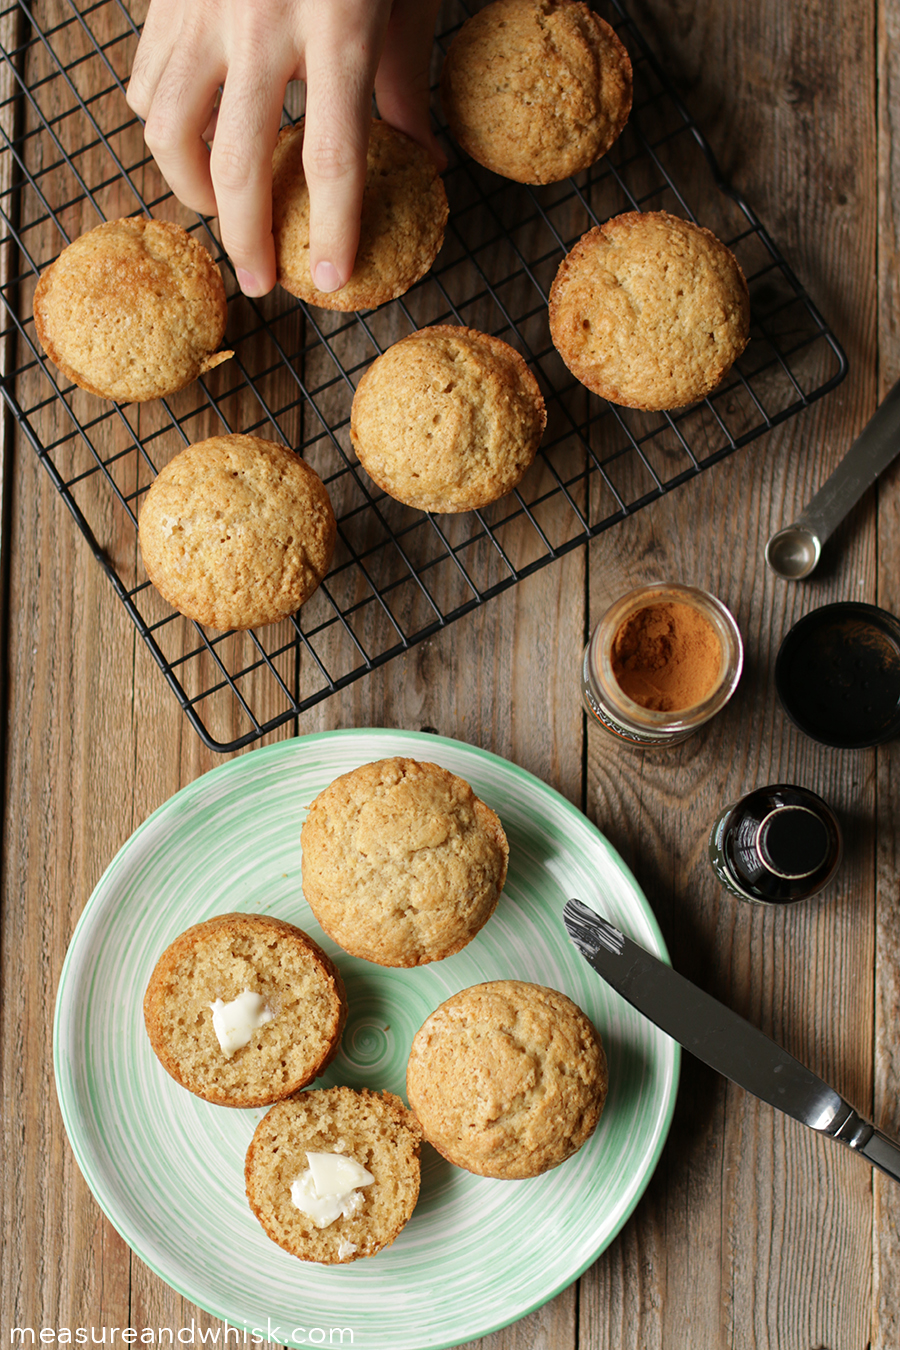
Cinnamon Muffins with Cinnamon Honey-Butter

Wednesday, January 4, 2017

This post is in collaboration with Frontier Co-op and Mambo Sprouts

A few days ago,  I awoke to a noisy and bright electrical storm.  These types of storms typically happen a few times a year here in Texas.  I think they are awe inspiring, but am kind of afraid of them, because of the potential for flooding, fires, etc.  

The lack of control I feel over the elements is a little unnerving to me (I don't like swimming open water because of this, either).  I am not a super control freak and can handle letting someone else take control for a little while, but I do like taking the reins back on my house and my life, and especially my kitchen. 

I have mega control in my kitchen.  It is my domain, and Adam almost always asks before eating anything in the kitchen (sometimes I feel kinda bad about this, but mostly it is helpful, so he doesn't eat a crucial ingredient to dinner, which is why he usually asks first).  

Eating well has been a major priority for us for quite a few years now.  We hardly ever have snacks around, because I try to provide 3 balanced meals a day, instead.  Part of our food reformation has included eating way more vegetables (thanks CSA share!), more seasonal fruit, and trying to buy organic as often as possible.  

Another place where I am learning to buy higher quality is in the spice and extract department.  In the past, I tended to buy whatever was the cheapest, but often you end up with cheap quality, and your food is typically less flavorful for it (or your food tastes like dust because your spices are old).    

These Frontier Co-Op spices are organic, GMO free, and incredibly flavorful.  I have used all of the spices in the photo below and was impressed by how good they were. They just added a lot to every recipe that I put them in (which has been a bunch, because these spices totally fit with my cooking).    

Check out Mambo Sprouts for more high quality food recommendations and recipes, and Frontier Co-Op for high quality spices and bulk foods!  

You can get $1.00 off your next Frontier Co-Op spice purchase with this coupon


Cinnamon Muffins with Cinnamon Honey-Butter 

Muffins: 
makes 12 muffins
7 Tbs butter, softened
2/3 cup sugar
1 large egg
1 1/2 cups all-purpose flour
1 1/2 tsp baking powder
1/2 tsp baking soda
1/2 tsp salt
scant 1/2 cup milk (just under a half cup)
1 tsp lemon juice


Cinnamon Honey Butter: 

makes about 1/2 cup

1/4 cup butter, room temperature
1/4 cup honey
1 tsp vanilla

To make the muffins, combine the soft butter and sugar in a stand mixer and mix until fluffy and smooth.  Add the egg, and mix some more.

In a medium bowl, add flour, baking powder, baking soda, salt and cinnamon and mix to combine.

In a measuring cup, pour the milk out, and then pour a little lemon juice over the top and let it stand for 2 minutes, until the milk has curdled.

Add the half of the dry ingredient mixture to the stand mixer, and then add half of the lemon/milk mixture and the vanilla. Stir, then add the rest of the lemon/milk mixture and the dry ingredients.

Preheat your oven to 350°F.  Grease a standard size muffin tin, and spoon out even amounts into each muffin well, until you have filled them all.

Bake for 20-25 minutes, or until a knife or toothpick comes out clean.  Remove them from the oven, wait about 5 long minutes, then carefully remove the muffins with a knife, to a cooling rack.

Wait another 5 minutes or so, or enjoy immediately.  Preferably with cinnamon honey-butter.

To make the honey-butter, combine butter, honey, vanilla and cinnamon in a stand mixer and beat until fluffy.  Feel free to leave out the cinnamon if you want a more versatile honey-butter. 

SaveSave

Lemon Spice Muffins

Thursday, December 15, 2016


I am a person who believes in miracles, but if I didn't, I would have to say that cooking these muffins would convince me that they exist.

There is something amazing about turning a bunch of raw ingredients into a thin paste-like substance that once cooked, forms the lightest, fluffiest morsels you have ever tasted, with just a hint of crunch around the edges.

These muffins really are little miracles.  If you don't believe me, try making them.  The cinnamon adds a great flavor, there is a little kick from the ginger, and the lemon keeps them from feeling too heavy.  Plus, lemons are in season right now, so you can feel good about using them at this time of year.

They would make the perfect snack to eat while opening gifts on Christmas morning, or to tide your family over to dinner on Christmas Eve.  Or, just any old time you want something delicious, these are a great option!


Lemon Spice Muffins:
adapted from Food 52
makes 12 standard-sized muffins

1 inch unpeeled ginger, grated
3/4 cup +3 Tbs sugar
zest from 1-2 lemons
8 Tbs butter, softened
2 large eggs
1 cup minus 2 Tbs whole milk
2 Tbs lemon juice
2 cups flour
1/2 tsp salt
1/2 tsp cinnamon
3/4 baking soda

Preheat your oven to 375°F.

In a small pan, heat the ginger and 1/4 cup sugar over the stove, until the sugar begins to melt.  Continually stir while the sugar is melting.  Then remove from the heat and let it cool.

Put 3 Tbs of sugar in a small bowl, and add the lemon zest.  Mix with your hands, rubbing the sugar and lemon zest together, until the sugar is fragrant.  Add the lemon sugar to the hot ginger mixture and stir.

Next, combine the butter, with the 1/2 cup sugar in a stand mixer.  Beat until fluffy (30 seconds or so).  Add the eggs, one at a time, and beat.  While they are mixing, pour 2 Tbs of lemon juice into a 1-cup measuring cup.  Fill the remainder of the cup with whole milk, and let it sit for 30 seconds to one minute, until the milk curdles.

Add your milk mixture to the stand mixer.  Turn off the mixer, then add the flour, salt, cinnamon and baking soda and mix again until smooth.  Add the lemon-ginger mixture form the stove, and beat again until it is well incorporated.

Spoon into a greased muffin tin.

Bake for 20 minutes or until lightly browned around the edges.  Let them cool for 5 minutes, then remove the muffins, and let them cool all the way on a wire rack.

Try not to eat them all!  They are best the first day, but will last up to 3 days in a cool, dry place.

SaveSave

Vegetarian Chipotle Breakfast Bake

Thursday, December 1, 2016

This shop has been compensated by Collective Bias, Inc. and its advertiser. All opinions are mine alone. #VivaLaMorena #CollectiveBias


I love making a beautiful breakfast for my family, especially over the holidays, when we are all home in the mornings, and no one is rushing off to work, school or playdates.  We tend to eat the same thing over and over for breakfast around here, so having something fresh and festive is always welcome.  This breakfast bake (or frittata if you like) is absolutely stunning, incredibly full of flavor and has changed the way I see eggs for breakfast.  

I am not a huge egg person, but omelets and other egg bakes have recently become more appealing to me.  I have long been a fan of chipotle chilis and thought they would be a fun way to add a burst of flavor to this frittata. 

Bacon is the usual go to to flavor egg dishes, but since we eat mostly vegetarian, I needed to find an alternative solutions, and these were perfect!  Just enough spice without being too hot, and tons of authentic Mexican flavor.  The La Morena® peppers are a truly superior ingredient that made this vegetarian dish sing, and can be trusted to produce a fabulous product every time, especially when you have company during the holidays. This gorgeous chipotle frittata is definitely a reason to get family and friends together this holiday season!

La Morena® also has a sweepstakes going on! Check it out here: #VivaLaMorenaSweepstakes  
  

(I found the La Morena® Chipotle Peppers in Adobo - 7oz can at my local Fiesta grocery store)


Crispy Potato pieces

(Fox, our budding photographer, took this photo of the bake in the oven)

Chipotle Breakfast Bake
makes 1- 9" skillet 


1 Tbs olive oil

1 russet potato, thinly sliced
salt and pepper
1 Tbs olive oil
1/2 onion, diced
6 eggs
2 Tbs milk
2 or 3 La Morena® Chipotle Peppers in Adobo - 7 oz can, chopped into small pieces (almost a paste)
1/2 cup black beans
4 oz queso fresco, crumbled
salt and pepper

Preheat your oven to 400°F. On a baking sheet lined with a silicone mat, spread out the potato slices and drizzle with 1 Tbs of olive oil, and sprinkle with some salt and pepper.

While they are cooking, heat the oil in a 9" cast iron skillet on the stove, then add the onions too cook for about 15 - 20 minute until they are soft and translucent.   If you don't have a cast iron skillet, you can always cook the onions on the stove in a regular skillet and bake your frittata in an oven-safe dish.

In a medium sized bowl, combine the eggs, and milk.

When your potatoes and onions are done, add a little extra oil to the cast iron skillet and move it around until the bottom and sides are coated (use a paper towel if you have to), then arrange the potatoes in an even layer at the bottom of the skillet.  Top with onions, black beans, queso fresco and La Morena® Chipotle Peppers in Adobo - 7 oz.  Pour the egg mixture over the top, and sprinkle a fair amount of salt and pepper on the top.

Cover with foil (or a metal baking sheet) and bake for 20 minutes.  Uncover and cook for another 10 minutes, until the edges are beginning to brown.

Remove from the oven and serve immediately.  Enjoy!


SaveSave
SaveSave

Cinnamon Roll Twists

Monday, October 17, 2016


You know the book "The Five Love Languages?" I think the author ought to consider adding an additional language.  Food.  I feel loved when I am brought food, but more than that, I show my love through making food.  When I want someone to know I care about them, I make them food.

I made these as a birthday gift for a friend a few weeks ago, and they were so much fun to make.  They look way prettier than a normal cinnamon roll, so the recipient feels extra special when you show up on their doorstep with these beauties.  Also, you feel totally awesome when you pull them out of the oven, and they are all knotted and cinnamon-y.  Making them is really gratifying.

They would make a fabulous holiday breakfast or a delicious Christmas Eve treat (dip them in hot chocolate!!!). The cinnamon smell coming out of the oven will make your house smell divine and really get you into the holiday spirit :)

If you make them and post a photo, tag me on social media @measureandwhisk so I can see them!  Happy Baking!  


Cinnamon Roll Twists:

1 cup warm water

2 tsp active dry yeast
sprinkle of sugar
3/4 tsp salt
1/6 cup sugar
1 large egg
1 tsp vanilla extract
2 Tbs butter, melted
3-4 cups flour

Filling:
3 Tbs butter, melted
1/3 cup brown sugar
1 tsp cinnamon

Glaze: 
2 Tbs butter, melted
1/2 cup powdered sugar
1/4 tsp vanilla extract
1 Tbs hot water

In a large bowl, combine the active yeast, the water and the sprinkle of sugar.  Let it sit for 10 minutes, until your yeast is puffy.  Once the yeast is puffy, add the salt, sugar, egg, vanilla, butter and 2 cups of the flour and mix until a rough dough has formed.  Add 1/4 cup of flour at a time until the a nice soft dough has formed (as your dough takes shape, you may need to reduce the amount of flour you are adding to 1/8 cup or a tablespoon).  You want the dough to be soft, and just have passed the point of beings sticky.  If you add too much flour, you will get dry cinnamon rolls.

Put the dough in an oiled bowl, and cover with a damp towel.  Let it sit for 1 hour, until it has just about doubled in size.

While your dough is rising, combine the brown sugar and cinnamon in a small bowl to make your filling.  And melt your 3 tablespoons of butter.

Gently press the risen dough back down in the bowl, and set it on a clean, floured surface.  Cut the dough into 16 pieces.

Roll the pieces out, one at a time, into a 8-10" oval or rectangle.  spread it with butter, and sprinkle an even layer of brown sugar and cinnamon mixture over the top.  Next, slice two parallel slits into the dough, lengthwise.  Pick up the two short ends of the dough, and twist the dough like taffy, twisting the two ends in opposite directions, then tie the twist into a knot, The slits you cut in the dough should allow the cinnamon to show, but if they don't, peel the slits open a little so that you can see the cinnamon (For a slightly different technique with similar results, see this post here).

This recipe makes 16 rolls, so split the rolls into two cookie sheets, and let the first batch rise for 25 minutes or so, while you roll out the second batch.  While you are rolling out the second batch, preheat your oven to 350°F.

Bake the first batch for 20-25 minutes, until the tops are slightly golden.  Try really hard not to over bake these, because they do have the potential to dry out.  Once they are out of the oven, bake the second batch.

While the second batch is in the oven, make your glaze by combining the melted butter, powdered sugar and vanilla in a small bowl.  Add the hot water to thin it out, then pour it over the top of your warm cinnamon rolls.  ENJOY!


SaveSave
SaveSave

Chocolate Almond Coffee Cake

Monday, July 25, 2016


Many of my recipes start from a fully-formed idea (a meatball taco, for example).  I add a few ingredients that I think will work together, and I can usually have a working recipe in one or two tries.  Other recipes start from one or two ingredients, then I build around them to create a recipe.

This recipe was the latter.  I had Bob's Red Mill Gluten Free Rolled Oats and almonds, and was trying to figure out what would be the best use for them.  The rolled oats are hearty and a bit chewy, so I knew they would be great for a crumble-type topping.  After I thought of adding chocolate and almonds to the oats, a coffee cake seemed like the natural choice.

This coffee cake is decadent, moist, and very delicious.  The ingredient list looks a mile long, but don't be deceived: almost all the ingredients are things you probably already have in your pantry and fridge, and several of the ingredients are used in more than one section of the recipe.

This is the perfect brunch cake or dessert for your next dinner party!  After quite a bit of tinkering with the recipe, it really is quite fabulous! I hope you enjoy it as much as we did!


Chocolate Almond Coffee Cake:
Makes 1 Loaf

Wet Bowl: 
1/3 cup white sugar
1/3 cup brown sugar
8 Tbs butter, softened
1 large egg
1/8 tsp almond extract
1/2 tsp vanilla
3/4 cup sour cream

Dry Bowl:
1 1/4 cups flour
1/2 cup Bob's Red Mill Rolled Oats
1/2 tsp baking soda
1/2 tsp baking powder
1/2 tsp kosher salt
1/2 tsp cardamom

Filling:
1/2 cup Bob's Red Mill Rolled Oats
1/3 cup brown sugar
1/4 tsp sea salt
1/4 cup chocolate chips

Topping: 
1/3 cup almonds, chopped
1/4 cup chocolate chips

In a large bowl, combine the sugars and butter, and beat until combined.  Add the egg, almond extract, and vanilla extract, and mix together.  Add half the sour cream and mix.

In a medium-sized bowl, combine dry ingredients and mix.

Add the dry mixture to the wet mixture and mix, and then add the rest of the sour cream, and beat until just combined into a smooth batter.

In a small bowl, combine the filling ingredients and mix.

Line a loaf pan with parchment or wax paper (if using wax paper, spray the paper with a nonstick spray).  Pour 1/2 of the batter mixture into the prepared loaf pan.  Next, spread half of the filling evenly across the batter in the pan.  Pour the other half of the batter mixture over the filling, and smooth to make the top even.

Now pour the rest of the filling on top of the batter, and finish by sprinkling the rest of the chocolate chips and almonds evenly across the top.

Bake in an oven preheated to 375°F for 60 minutes.  Halfway through the bake time, cover with foil so the chocolate and almonds don't burn.  Test the loaf with a toothpick, and pull out as soon as the tooth pick comes out clean.  The middle may not rise much.  That is okay.  As long as it is cooked all the way through, you are good!  There is a good bit of filling in the middle that prevents the bread from getting really puffy.

Let cool for 5- 10 minutes, then remove it from the pan, and let cool for another 15 minutes.  Eat it as soon as possible.  It will taste best the first day.

Enjoy!


This post is in collaboration with Bob's Red Mill.  Thank you for supporting the brands that help make this blog possible!
SaveSave
Measure & Whisk: Real food cooking with a dash of minimalist living © . Harlie Ave Design .